It seems a bit proscribed to have halwa puri during weekdays but here I am, on a Wednesday morning, having halwa puri at my local neighborhood stall. It’s a wonderful day today. The weather is great – windy and crisp, the kind that makes living in Islamabad worthwhile. It reminds me of my Sundays as a kid when all I wanted was the most crispy puri my mom made.
Theoretically, halwa puris, the most amazing of all breakfasts are reserved for weekends. And I have to warn you, halwa puri isn’t for you if you aren’t patient (Dude, you will have to wait for hours in the queue) or have a weak stomach.
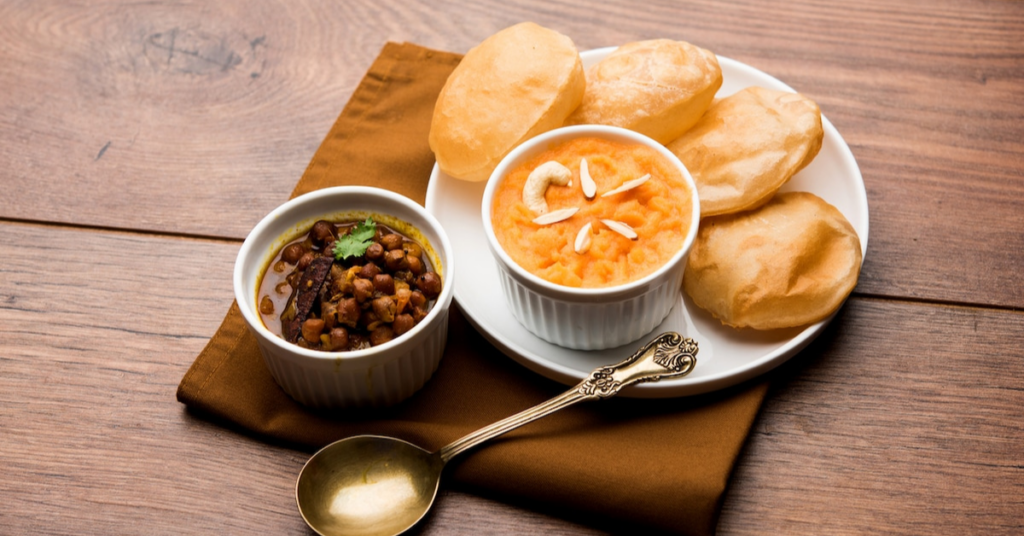
Halwa Puri isn’t just some breakfast, it’s the most amazing breakfast platter to exist in the entire universe. Every time I have halwa puri, it evokes nostalgia. All I know is that no matter what happens in the future, this combination platter will always stay the same.
Origin:
When it comes to the origin of Halwa Puri, it is said to have originated in the Punjab of the Indian Subcontinent. Some writers also claim that it originated in Nepal, in a region called Terai by the Madheshi community.
The traditional dish consists of deep-fried, thin, puffy bread called puris, served with a side of halwa that is made of semolina, sugar, ghee/oil, and nuts (almonds, pistachios), and extremely spicy gravy made of potatoes and chickpeas.
Slight Variation:
Sometimes, instead of one curry, there are two separate curries: alu ki bhujiya and chickpeas. If you have ever visited Andaroon Lahore, you must be fimiliar with their serving idea i.e., serving halwa puri with achaar and fried onions. And if you are having this meal on a Sunday, free complimentary sweetened lassi seals the whole deal. I know you must be thinking, “This one is crazy. How can one talk about Halwa Puri as if it’s the only breakfast option available?” But guys, it’s okay to cheat on your diet every once in a while. No biggie.
Perfect Puri Ingredients:
Whole Wheat Flour (Atta) or All-Purpose Flour:
Although most people like to either use whole purpose flour or whole wheat flour but my personal recommendation is to use a combination of both. This is because all-purpose flour makes the puri very soft whereas the wheat flour brings structure to the puri.
Oil:
Although you can use ghee, I’d recommend that you go for oil. It makes the puri extremely soft.
Water:
While kneading the dough, use lukewarm water. It will make the whole kneading process very simple and easy. You will have to keep kneading until firm dough forms.
Ajwain Seeds:
If someone in your house suffers from digestion issues, add ajwain seeds for ensuring that they can have a pleasant experience with halwa puri. It also adds a very unique and different flavor.
Yogurt:
This ingredient is exceptional. If you want your puris to be extraordinarily soft, add a bit of yogurt to the dough. It will make your puris very, very soft.
Killer Trick to Make the Best Puris at home:
Please don’t freak out that you can’t make perfect puris at home. Trust me, with the right recipe and trick, you can make perfect puris at home. Today, it’s my responsibility to walk you through the whole process like a walk in a garden full of roses.
The first step is to add all the ingredients of puri together except for lukewarm water. Mix all ingredients together and start adding a lit bit of lukewarm water. After adding a little bit of water, small tight doughs will start forming. Knead them all together until one big ball forms. This should neither be too hard nor too soft.
After the dough is ready, cover it with any lid and let it rest for 1 hour. It will double in size after an hour. Afterward, divide it into small balls of dough and start by rolling them out one by one. Use your fingers to flatten dough balls and then roll them in the form of thin flat discs. This step is very important because it ensures that the dough will puff up while being fried.
In order to avoid the dough balls from sticking to the surface, apply oil with the help of a brush to all sides of the dough balls.
Are you not sure if the oil is at the right temperature for frying? Don’t worry. All you need to do is add a small piece of dough to the oil. If it floats up and the oil sizzles, your oil is ready.
Disclaimer: Oil should be extremely hot. Make sure you know what you are doing
You will know if your puri is ready if the golden-brown color is achieved. Once made, remove them from the pan and place them on a paper towel so that excess oil is absorbed.